
Initiate a Verified Payout
Flow
The Verified Payout product supports two distinct scenarios, each with a different user flow. Follow the step-by-step guide below to ensure a successful integration based on your chosen scenario.
- Scenario 1: No verified beneficiary
In this scenario, you do not have a verified beneficiary to send the funds to. Instead, you request Fintecture to collect the beneficiary details in a secure manner and automatically transfer the payout to the designated account.- Request a
PISdedicated access token - Trigger the payout by submitting all the necessary information, and redirect the Payee to the URL provided in the API response
- Verify the payment on callback to validate the payment status and that your order ID corresponds to the payment
- Listen to Webhooks to intercept payments status change events
- Request a
- Scenario 2: With verified beneficiary
If you already have a verified beneficiary, you only need Fintecture to transfer the funds directly to their account.- Request a
PISdedicated access token - Trigger the payout by submitting all the necessary information. If the provided information is valid, the payment is to be initiated and processed immediately
- Listen to Webhooks to intercept payments status change events
- Optionally, you can also fetch the payment status if you don't support webhooks.
- Request a
🚧 ImportantSignature, digest, date and x-request-id headers are optional in SANDBOX environment but mandatory when calling the PRODUCTION one.
💡 NoteA Fintecture Payout account needs to be configured and associated to your application. Contact Support to setup the Payout account.
Payment Session statuses
Below are detailed the payment session statuses and transfer states encountered in the case of a verified payout.
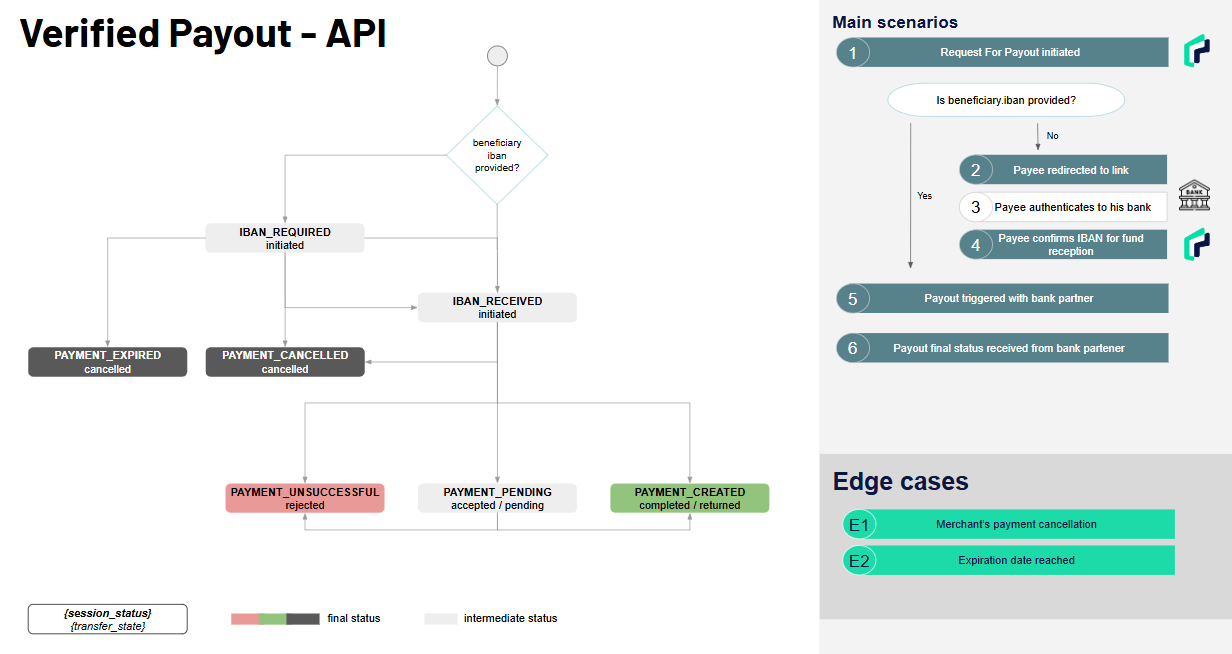
NoteDo not hesitate to consult all of the payment statuses for more information.
Scenario 1
NoteThe following guide assumes you have already registered your application.
1. Request an Access Token
The first step is to authenticate your application with the Fintecture API Gateway and this is done using the /access token API, as illustrated.
To use the API, you must first create a basic token. To do so, encode the following string using a base64 encoder:
`basic_token` = base64(`app_id`:`app_secret`)Include your app_id and basic_token in the following request:
POST /oauth/accesstoken HTTP/1.1
Authorization: Basic [basic_token]
Accept: application/json
Content-Type: application/x-www-form-urlencoded

grant_type=client_credentials&app_id=[app_id]&scope=PIS
The expected response is the following:
{
  "token_type": "Bearer",
  "access_token": "eyJhbGciOiJub25lIn0.eyJleHAiOjE1MTQwODA0MjQsI...",
  "expires_in": 3600
}
Store the access_token for the next step
2. Create a Request For Payout
The second step is to create a Request For Payout Payment Session to receive the connect URL which will enable the Payee to complete his payment flow by sharing securely his account information.
Simply POST the illustrated request including all the necessary headers, body and query string. For more information on each field, see the Payout API
POST /pis/v2/request-for-payout?redirect_uri=[redirect_uri]&state=[state] HTTP/1.1
Authorization: Bearer [access_token]
Signature: [signature]
Digest: [digest]
Date: [date]
x-request-id: [request_id]
Accept: application/json
Content-Type: application/json{
"meta": {
"psu_name": "John Doe",
"psu_email": "[email protected]",
"expiry": 604800,
"method": "link"
},
"data": {
"type": "payments",
"attributes": {
"amount": "26.99",
"currency": "EUR",
"communication": "MyShop REFUND from Order 123"
}
}
}The above example shows how a payout link can be generated but other methods also exist such as email or sms. In this example, a link is generated following the below example which must be presented to the Payee in a redirection flow.
{
	"meta": {
		"code": 201,
		"session_id": "23e8f09e2cab4752b8c4c3f00bf9f45c",
		"method": "link",
		"url": "https://connect.fintecture.com/v2/gff0f101-601d-4c2c-96f9-f6d7a6089578"
	}
}
Following the payout, they will be redirected back to the provided redirect_uri with the following query string parameters among others:
session_id: the payment session_idstatus: the status of the payment (see status section for more information on the status)state: the state parameter which you provided during the PIS Connect URL
3. Verify the Payment
Once the Payee is redirected back to your redirect_uri, verify the payment on your server: never rely on the redirect query parameters alone. Use the session_id to call the GET payment API, check the payment status, and confirm that the payment corresponds to your order.
GET /pis/v2/payments/[session_id] HTTP/1.1
Accept: application/json
Authorization: Bearer [access_token]
Signature: [signature]
Date: [date]
X-Request-Id: [x-request-id]
The expected response is the following:
{
    "meta": {
        "session_id": "34f00841780445d4981be9ea2f8aafae",
        "status": "payment_created",
        "type": "RequestForPayout",
        "customer_id": "4621eacaccd04fa772638dec70da323c"
    },
    "data": {
        "id": "44f00841780445d4981be9ea2f8aafae",
        "type": "payments",
        "attributes": {
            "amount": "273",
            "currency": "EUR",
            "communication": "B34970692",
            "end_to_end_id": "44f00841780445d4981be9ea2f8aafae",
            "execution_date": "2021-02-28",
            "scheme": "SEPA",
            "transfer_state": "completed"
        }
    }
}
4. Webhooks
Webhooks enable you to be notified of an event such as a payment status change.
In the context of a payment model based on redirection, it is important to use a redundant payment notification channel in case the redirection fails. Some implementations use webhooks as the main payment notification channel and the redirection simply displays the resulting payment result.
You can add webhooks to your application using the Console. As described in Manage webhooks, a webhook takes the following parameters:
url: The URL to which the event message will be sentoffset: The delay in minutes after which the event message will be sent once an event occursevent: The list of events to which you want to subscribe the webhookheaders: Optional custom headers to add to the webhook request (e.g.Content-Type: application/json)
The webhook is an application/x-www-form-urlencoded POST request (or application/json if you configured a Content-Type header) which is signed using your public key. Verify the signature using your private key, and only then process the order based on the result of the payment.
Exponential Time IncrementWebhook will retry 20x with an exponential time increment if your server doesn't respond with a HTTP code in the 2XX range.
The HTTP request made by our servers to your endpoint will be similar to the following:
POST /webhook HTTP/1.1
Host: mywebsite.com
Signature: keyId="2dfdcf57-5b2f-4309-846f-913d0b2802cf",algorithm="rsa-sha256",headers="date digest x-request-id",signature="h0V0SUbjRhLEP/MiYo0Mgs1N17EuCEmKyQrDjxysc7iSiFXTjvY6qVEoaiRkzB8ZI0J39gGwOtTXN9CJPVRbhEHhi9Z9rQvM33FkygXvvx8BwM76fSTQ2/BSZWx04CjbPv/XUVusnkKVr3W6p+Vn073hAuJn1nKCvDOyl+QnDtstkzT+UacVzDA9L9nyPbbaPQHJobaZuG8TjhnI+Y0PZxneke6OU6fcdPT0uwkEamDOOExcMryHIX1iH5iiPMvLoVA8acqvvMSDYar0rlEQ2J1M4dcowWT8FxLo6C8uqvJIaBYm7Ze0RNJOwY0UBImCVDIuQLJuBjPwjQT5GjTQlg==
Digest: SHA-256=wOtTXN9CJPVRbhEHhi9Z9rQvM33FkygXvvx8BwM76fS
Date: Mon, 08 Jun 2020 23:11:23 GMT
X-Request-ID: 88c414df-6895-48db-8ef3-1fd1ce4272c6
Content-Type: application/x-www-form-urlencoded

session_id=b2bca2bcd3b64a32a7da0766df59a7d2&status=payment_created&customer_id=1ef74051a77673de120820fb370dc382&provider=provider&state=thisisastate
Make sure to validate the integrity of the webhook by validating the signature using your private key. It is also recommended to whitelist the IP addresses which you can find here
Scenario 2
NoteThe following guide assumes you have already registered your application.
1. Request an Access Token
The first step is to authenticate your application with the Fintecture API Gateway and this is done using the /access token API, as illustrated.
To use the API, you must first create a basic token. To do so, encode the following string using a base64 encoder:
`basic_token` = base64(`app_id`:`app_secret`)Include your app_id and basic_token in the following request:
POST /oauth/accesstoken HTTP/1.1
Authorization: Basic [basic_token]
Accept: application/json
Content-Type: application/x-www-form-urlencoded

grant_type=client_credentials&app_id=[app_id]&scope=PIS
The expected response is the following:
{
  "token_type": "Bearer",
  "access_token": "eyJhbGciOiJub25lIn0.eyJleHAiOjE1MTQwODA0MjQsI...",
  "expires_in": 3600
}
Store the access_token for the next step
2. Create a Request For Payout
The second step is to create a Request For Payout payment session by providing all the necessary information.
Simply POST the illustrated request including all the necessary headers, body and query string. For more information on each field, see the Payout API
POST /pis/v2/request-for-payout?redirect_uri=[redirect_uri]&state=[state] HTTP/1.1
Authorization: Bearer [access_token]
Signature: [signature]
Digest: [digest]
Date: [date]
x-request-id: [request_id]
Accept: application/json
Content-Type: application/json{
"meta": {
"psu_name": "John Doe",
"psu_email": "[email protected]"
},
"data": {
"type": "payments",
"attributes": {
"amount": "26.99",
"currency": "EUR",
"communication": "MyShop REFUND from Order 123",
"beneficiary": {
"name": "John Doe",
"iban": "FR12312321321232321",
"swift_bic": "BNPAFRPPXXX"
}
}
}
}The above example shows a request for payout where the merchant already has a verified account from the Payee. If the provided information is valid, the payment gets processed immediately and the Payee has no actions to do.
{
  "meta": {
    "status": "payment_created",
    "session_id": "ecec9f13407f4c2cb5f1591255e8f815",
    "type": "payout"
  },
  "data": {
    "id": "ecec9f13407f4c2cb5f1591255e8f815",
    "type": "payments",
    "attributes": {
      "transfer_state": "completed",
      "amount": "273.00",
      "currency": "EUR",
      "communication": "B34970692",
      "end_to_end_id": "23e8f09e2cab4752b8c4c3f00bf9f45c",
      "debtor": {
        "bank_account_id": "dc5b0048-2a80-4a22-b2f9-fad7d72f074d"
      },
      "beneficiary": {
        "name": "Julien Lefebre",
        "iban": "FR1420041010050500013M02606",
        "swift_bic": "BANKFRXXXXX"
      }
    }
  }
}
NoteIf the payout is rejected, more information is provided through the transfer_reason field, available when you fetch the payment or via webhooks. For example, when transfer_state is
rejected, transfer_reason can befraud_suspected.
3. Webhooks
Webhooks enable you to be notified of an event such as a payment status change.
You can add webhooks to your application using the Console. As described in Manage webhooks, a webhook takes the following parameters:
url: The URL to which the event message will be sentoffset: The delay in minutes after which the event message will be sent once an event occursevent: The list of events to which you want to subscribe the webhookheaders: Optional custom headers to add to the webhook request (e.g.Content-Type: application/json)
The webhook is an application/x-www-form-urlencoded POST request (or application/json if you configured a Content-Type header) which is signed using your public key. Verify the signature using your private key, and only then process the order based on the result of the payment.
Exponential Time IncrementWebhook will retry 20x with an exponential time increment if your server doesn't respond with a HTTP code in the 2XX range.
The HTTP request made by our servers to your endpoint will be similar to the following:
POST /webhook HTTP/1.1
Host: mywebsite.com
Signature: keyId="2dfdcf57-5b2f-4309-846f-913d0b2802cf",algorithm="rsa-sha256",headers="date digest x-request-id",signature="h0V0SUbjRhLEP/MiYo0Mgs1N17EuCEmKyQrDjxysc7iSiFXTjvY6qVEoaiRkzB8ZI0J39gGwOtTXN9CJPVRbhEHhi9Z9rQvM33FkygXvvx8BwM76fSTQ2/BSZWx04CjbPv/XUVusnkKVr3W6p+Vn073hAuJn1nKCvDOyl+QnDtstkzT+UacVzDA9L9nyPbbaPQHJobaZuG8TjhnI+Y0PZxneke6OU6fcdPT0uwkEamDOOExcMryHIX1iH5iiPMvLoVA8acqvvMSDYar0rlEQ2J1M4dcowWT8FxLo6C8uqvJIaBYm7Ze0RNJOwY0UBImCVDIuQLJuBjPwjQT5GjTQlg==
Digest: SHA-256=wOtTXN9CJPVRbhEHhi9Z9rQvM33FkygXvvx8BwM76fS
Date: Mon, 08 Jun 2020 23:11:23 GMT
X-Request-ID: 88c414df-6895-48db-8ef3-1fd1ce4272c6
Content-Type: application/x-www-form-urlencoded

session_id=b2bca2bcd3b64a32a7da0766df59a7d2&status=payment_created&customer_id=1ef74051a77673de120820fb370dc382&provider=provider&state=thisisastate
Make sure to validate the integrity of the webhook by validating the signature using your private key. It is also recommended to whitelist the IP addresses which you can find here
4. Fetch the Payment Status
If you don't support webhooks or you want to have a redundant polling strategy on top of webhook notification, you can implement the GET API to retrieve the payment status. Use the session_id received on payout creation to call the GET API.
GET /pis/v2/payments/[session_id] HTTP/1.1
Accept: application/json
Authorization: Bearer [access_token]
Signature: [signature]
Date: [date]
X-Request-Id: [x-request-id]
The expected response will be
{
    "meta": {
        "session_id": "34f00841780445d4981be9ea2f8aafae",
        "status": "payment_created",
        "type": "RequestForPayout",
        "customer_id": "4621eacaccd04fa772638dec70da323c"
    },
    "data": {
        "id": "44f00841780445d4981be9ea2f8aafae",
        "type": "payments",
        "attributes": {
            "amount": "273",
            "currency": "EUR",
            "communication": "B34970692",
            "end_to_end_id": "44f00841780445d4981be9ea2f8aafae",
            "execution_date": "2021-02-28",
            "scheme": "SEPA",
            "transfer_state": "completed",
            "transfer_reason": ""
        }
    }
}
Updated 6 days ago